
SDR, or Software Defined Radio is the use of software instead of hardware in the radio world. Believe it or not, radio is still a common communications medium. It’s still used by Police, Fire, and Rescue on a regular basis. There are still amateur radio enthusiast communicating over long distances, CB radios over shorter distances, and signals continue to be sent from satellites in space. Our computers and cell phones continue to use it for wireless connections over WIFI, Bluetooth, Zigbee, LTE, and many other protocols. A lot of the older technology is still in use, and newer types of technology get added regularly. There is a huge spectrum of SDR to explore, but this post will focus mostly on the basics, and act as an introduction to the subject.
Before you start exploring SDR, you need to know a little about radio frequencies. Most people understand the basics, like FM radio between 87Mhz-108Mhz. FM is a good starting point in SDR because you can use a local radio station to verify that your SDR device and antenna are working. When you turn on the FM Radio in your car, the numbers on the screen are literally the frequency of the station. If you listen to Hot97 in NYC, your turning to 97.1MHz. The nice thing about SDR is that we can listen way above or below that range of frequencies. Moving up passed 108MHz puts you into a range that Aircraft use to communicate.
Interesting fact, many old home radios from the WW2 era had a knob to switch between AM, FM, and aircraft.
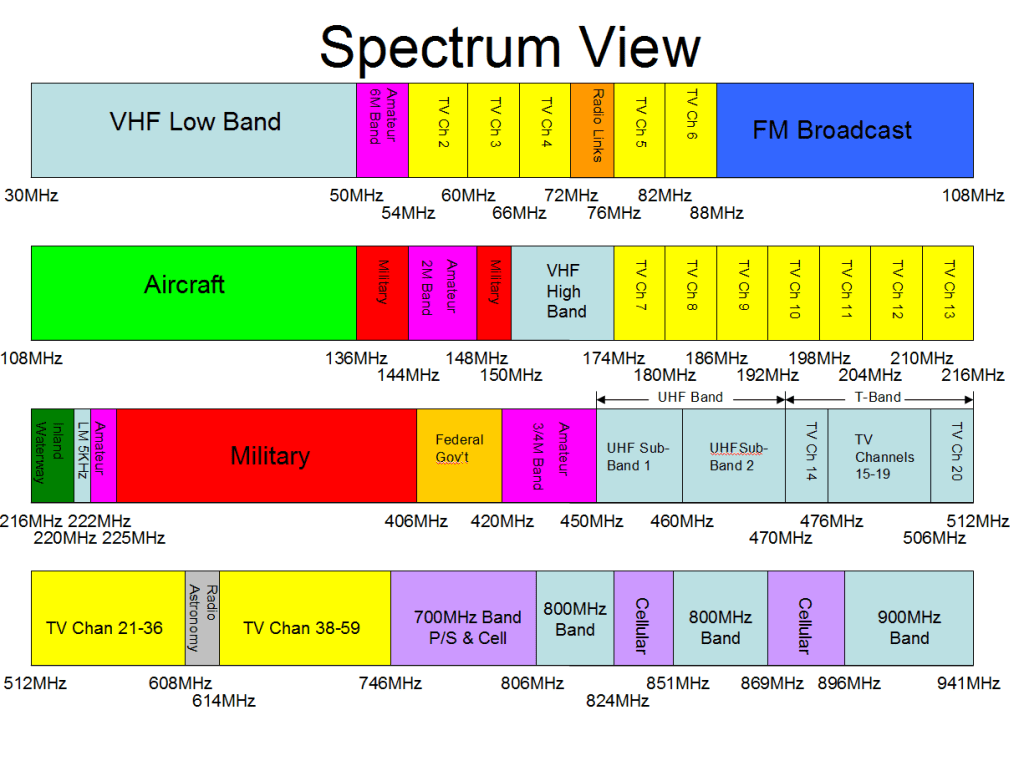
The image above is outdated, but gives a good overview of what’s what on different frequencies. Two ranges you might notice are missing from this diagram are WiFi and AM radio. AM is found on much lower frequencies, around 1Mhz. WiFi is on the opposite side of the spectrum at 2.4Ghz (2400Mhz) and 5Ghz (5000Mhz)
Antennas.
This is where it really gets tricky. Wavelengths of frequencies determine the size of the antenna. Most people make the mistake of thinking bigger antennas are better. This is not true, and can hurt in certain cases. The lower the frequency, the longer the wavelength. Longer wavelength means bigger antenna. 100Mhz is requires roughly a total of 4ft antenna, while 3MHz would require a combined 156Ft. antenna. Most antenna can operate at half the size, called a half wave-length antenna. There are several good antenna calculators online, such as at Dipole Antenna Calculator
Consider this, how much longer is your car radio antenna, than your cell phone antenna? Most people don’t even realize their cellphone has an antenna because it’s so small that it fits inside the phone. Most modern smartphones have the WiFi, Bluetooth, and Cellular Antennas literally in a circuit board as shown below.

Sometimes you will see much larger directional antennas, such as WiFi antennas, that claim to receive better reception or more WiFi networks. This is true, but only in the direction they are pointing. These yagi antennas have “directors” and “reflectors” which help to broadcast and receive radio frequencies from further distances, but the part of the antenna that is doing all the work is very small.
I could do an entire blog just on antennas and antenna theory, but for the purpose of this blog we’ll only talk about the basic antenna, a dipole. Dipole antennas have a positive and negative side, one for the wave going up, and one for the wave going down. Think old rabbit ear TV antennas. Most antennas are this same type, but turned sideways.

If you remove the rubber from a basic WiFi antenna, you will notice they do this by taking coax cable and exposing the inside of the wire. The inner part acts as one pole and the outer shielding acts as the other pole. It’s literally a stripped wire inside hard plastic to keep it upright.

Why does this matter? Choosing an antenna can make a big difference depending on what your trying to do, but they are not as complicated as they appear. For beginners, I suggest using a set of rabbit ears. The last rabbit ear antenna I found at a yard-sale for $1. If nothing else, you can use a bare copper wire around 6” long, connected to the inner conductor of antenna output. but most cheap SDR devices come with a small antenna. Which brings us to the next section.
SDR USB Devices
Feb 17 2009 was the date that all over-the-air TV broadcasting (aka local TV stations) were required to switch from analog to digital. People who relied on local TV using an antenna would need a new TV with a digital tuner built in, or a separate digital tuner set-top-box to hook to their older TV. Manufacturers decided to also offer USB digital tuners which allowed digital TV to be received on a PC, because they were cheap to make. They were called DVB-T TV Tuner Dongles and generally use the RTL2832U chipset.
Hackers realized that by changing the drivers in Windows, the RTL2832U could be accessed directly with Software Defined Radio software, and were able to recieve way beyond the range of UHF TV frequencies. DVB-T dongles then became known as RTL-SDR within the hacker world and became somewhat popular because they be purchased for as little as $7. History on the subject can be found at https://www.rtl-sdr.com/about-rtl-sdr/
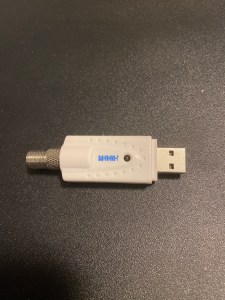
Above is my first RTL-SDR Dongle. It’s a standard DVB-T USB dongle, and has a type-F coax connector. This is the standard connector for Cable TV and UHF TV antennas. It can pick up between 20Mhz-950Mhz. Newer RTL-SDR Dongles have a wider range, but are usually around $25.
What can it do? If you have ever used a police scanner, it’s like that on steroids. It can pick up FM radio, police, EMS, Fire, pagers, older baby monitors, taxis, some satellites, aircraft (positions and communication), weather radio, some CB stations and a lot more.
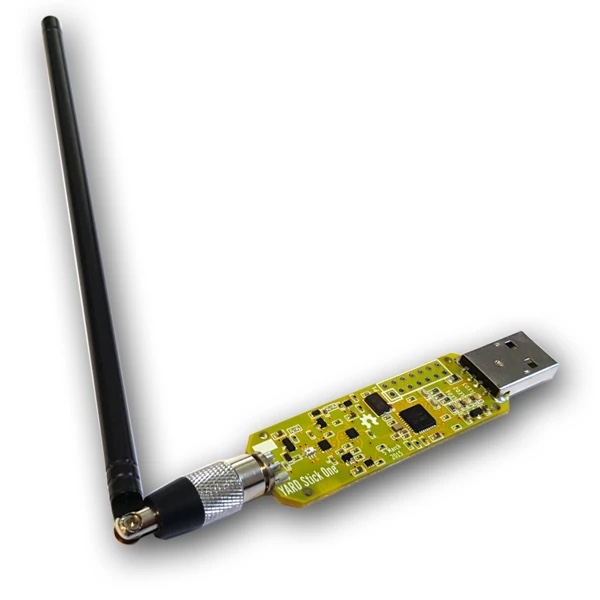
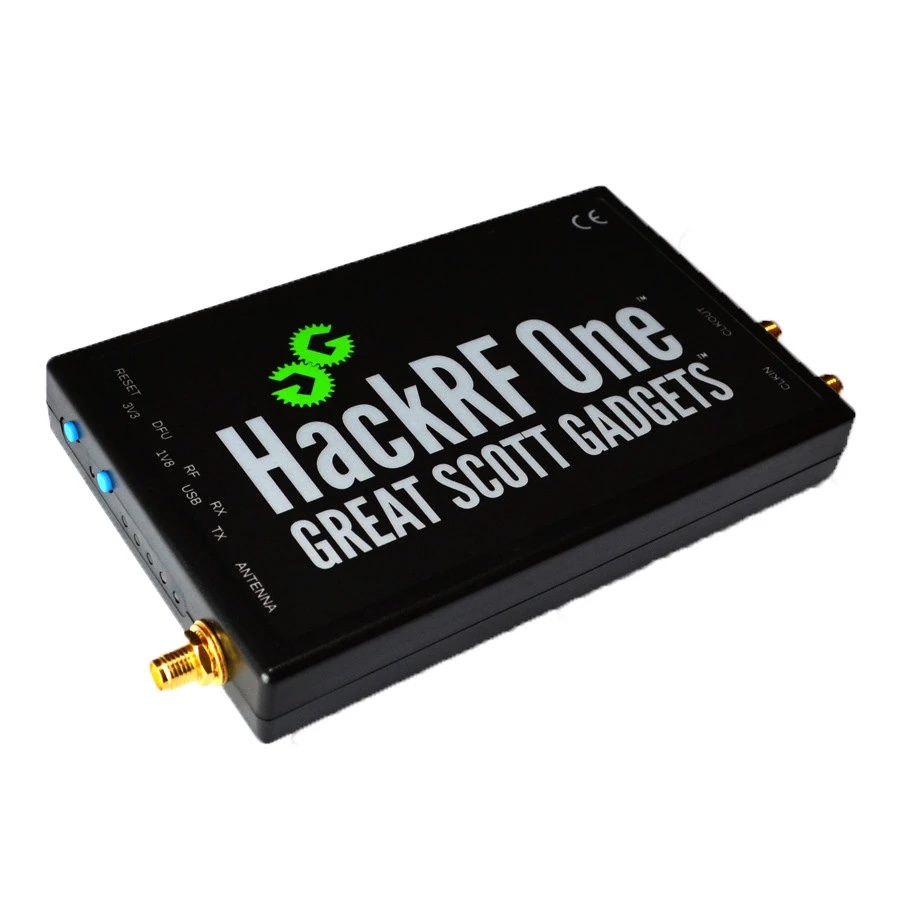
The next step up in devices would be a Yardstick One or HackRF. These get a are a bit more expensive but the HackRF has the ability to transmit. Be careful because this can be illegal depending on the frequency and range.
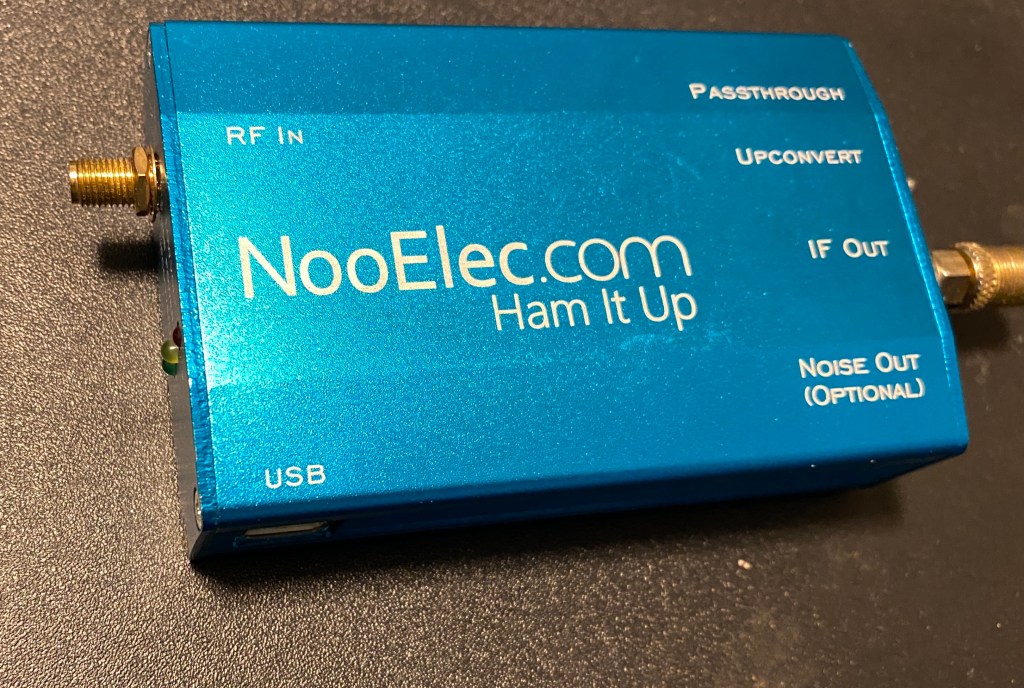
Other types of hardware to consider are Up-converters and down-converters. These devices can extend the frequency range of your SDR receiver, by taking lower or higher frequencies, and inputting them as a UHF frequency into the RTL-SDR. Below is a picture of my “Ham It Up” by NooElec. This is a USB powered up-converter that connects in line with your SDR dongle and drops the frequency range down to below 1Mhz and inputs it as 120Mhz
Software
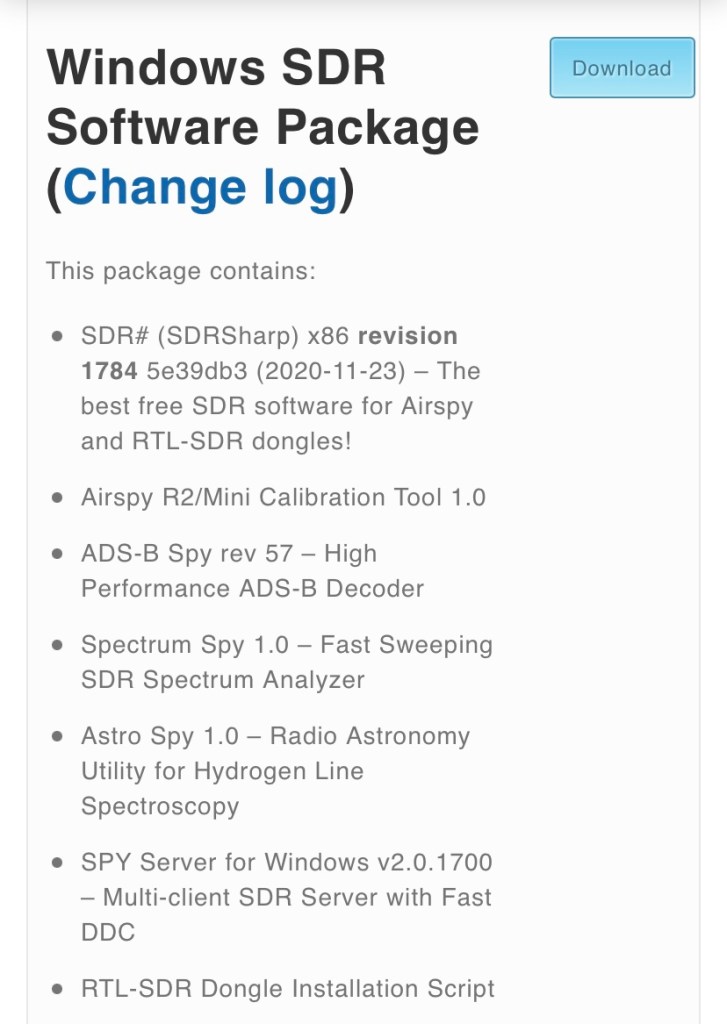
The software that I recommend starting out with is SDR# or SDRSharp for Windows. Look for the Download link beside Windows SDR Software Package at https://airspy.com
SDRSharp comes packaged with Zadig, a small app that changes the driver associated with your SDR dongle so that it will work with RTL-SDR software. If this doesn’t come with the package, or you find that your SDR doesn’t work in SDRSharp, then check the lower part of the same website for “WinUSB Compatibility Driver”.
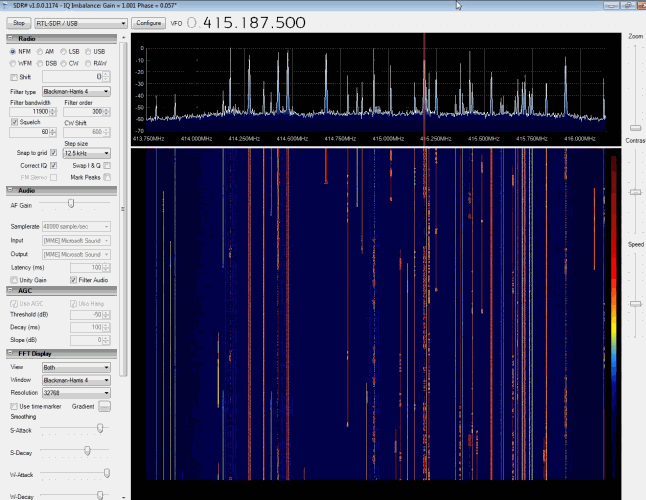
The nice thing about SDRSharp is that it gives a clean visual of the frequencies your looking at. It’s great for exploring what is going through the air in your area. Select RTL-SDR/USB from the drop down menu in the top left and click Start. Click Configure to tune the power on your SDR if desired. You can then drag the top right window right or left to select the frequency to monitor. The right also has a selection for NFM (narrow FM), WFM (Wide FM), AM, and others. Play with the section and try all three when you notice activity on a certain frequency. Your standard FM radio stations are going to be WFM, while other signals will usually be either NFM or AM. Most other options will be more useful on HF, which would require and up-converter. I highly suggest checking youtube for videos on how to use SDRSharp if your not familiar with SDR software. It can seem overwhelming at first, but only takes a few minutes to learn.
SDRSharp also has an option for up and down-converters, to show the actual frequency being searched, rather than the one it’s being converted to. It supports plugins for recording, noise control, and receiving and decoding digital voice.
You can find a big list of software at https://www.rtl-sdr.com/big-list-rtl-sdr-supported-software/
They also include other SDR receivers for Linux, macOS, Rasbpian, Android, and web-apps
At the bottom of that site there is a section called “Programs Compatible Through Piping” . Many of these were created for other radio devices to decode digital signals using the microphone input on a PC. Search the web for “Virtual Audio Cable” (Windows only). This app creates virtual audio inputs and audio outputs, so that SDRSharp can be assigned to a virtual audio output, which will show up in other apps as an audio input, mimicking a microphone
Interesting apps to check are DSD+ which can decode digital police and other digital audio and data communications, and PDW which can decode data being sent to pagers.
Security
Much of what is broadcasted on RF is not encrypted. Encryption and Security are things that aren’t typically considered in the RF world, except for WiFi and LTE. Otherwise, little has changed with these communications since they were created.
Things that should consider better RF security includes garage door openers, keyfobs, cordless phones (yeah, they’re still around), baby monitors, and much more. You might be surprised at what you will find.
My purpose for writing this is to get people interested. I may add more specific posts on the subject at a later date. Below are some links to useful websites on the subject.
Signal ID Wiki – https://www.sigidwiki.com/wiki/Signal_Identification_Guide
The BIG list of RTL-SDR Software https://www.rtl-sdr.com/big-list-rtl-sdr-supported-software/
Great Scott Gadgets – home of HackRF https://greatscottgadgets.com/
Attify Shop – IoT, SDR, and Embedded security tools https://www.attify-store.com/collections/frontpage
